Write Post Using PLR. It’s a time saver plus the main structure or outline of your post in already done for you.
Would you like to learn to write your next How-To post using PLR content?
According to a BuzzSumo analysis of a million articles (over an 8-month period), How-To posts are some of the most shared content on social media.
Not as popular as lists and infographics, they’re still something to include in your blog marketing strategy.
Take a look the chart below from OkDork:
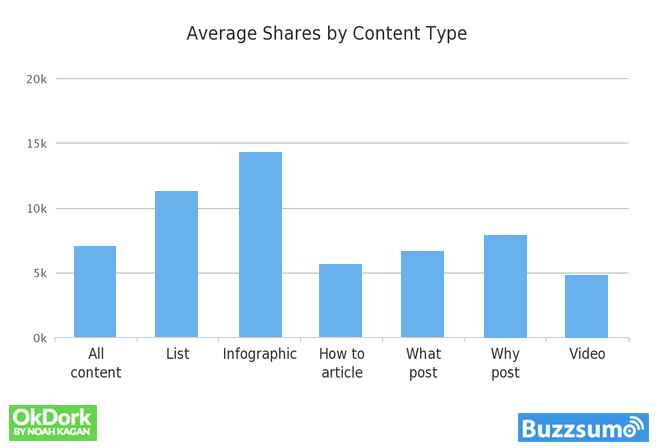
BuzzSumo suggests including images and infographics so your readers don’t get overwhelmed by all the text. This is especially important for long-form content - the “meaty” or pillar posts on your blog.
Did you know that List posts and Infographics are the top shared? #blogcontentClick To TweetSuggested Reading: formatting your blog post for your readers [like Kim Kardashian]
When you’re limited on time and need a quick post to publish, use this simple method for turning a PLR article into a How-To Post.
Write Post Using PLR in 7 Simple Steps
Don’t have time to read the whole post? PIN for later
Step 1: Get your PLR Content
Obvious, right?
Here are some free samples you can test.
You’ll want to stick to your niche. Don’t use healthy diets for diabetics when your blog or business serves pet owners who travel.
The content MUST match the audience and it MUST have a job.
By job, I mean you shouldn’t post this How-to article unless it serves your readers and directs them to your solution.
Your solution could be a product, a service, or simply joining your mailing list to further educate them.
For example, My Get it Done Day for PLR Buyers who want to transform and use their content right away.
Step 2: Read through your content and select 3 - 5 points
I’m using an article on emergency preparedness. The three points I’ve chosen are:
- How to Choose a Safe Meeting Place
- How to Build a Supply Kit You’ll Actually Use
- How to Secure Reliable Communication for a Disaster
Step 3: Write 100 words for each point
Once you select your main points, write a paragraph of about 100 words or more to expand on the point.
You can grab bits and pieces from your PLR content, add some statistics (like I did above) or if appropriate, a quote.
Embed a Facebook post, an Instagram post, or even a Tweet that adds to your topic.
Publish and share your content on Monday or Tuesday to get more shares. https://t.co/gIkHW1thAb via @noahkagan @BuzzSumo
— SaraD. (@saraassistsyou) October 12, 2017
Another option is to include a personal story, a customer’s experience, or even a case study or example.
Step 4: Recommendations tools or resources or products
Since most people who use PLR content are content creators, businesses, or trainers, you’ll probably want to recommend products or services within your content.
In my sample, I’d choose to recommend, solar radios, solar battery packs, headlamps, or emergency kits for pets.
I'm learning how to write a quick How-To post using PLR content, not bad...Click To TweetStep 5: Write the conclusion and Call to action
All that’s left to do is to write the conclusion. Wrap up what you’ve said in your post and transition into your call to action.
Step 6: Create blog images and Social Media images
Every good post whether it is a list post or a how-to post needs brilliant images. Create shareable images like tips, quotes, or even “snackable” infographics. These are mini versions of the long infographics. I could take the 7 steps of this post and turn it into a “snackable” How-to image.
I made the image below in Canva.com. The super girl is from Pixabay.com. I used PicMonkey* to delete the text on the image and replace it with “Super PLR Content”. I have a template I use for Facebook posts so added my text to that and BAM, a snackable infographic.
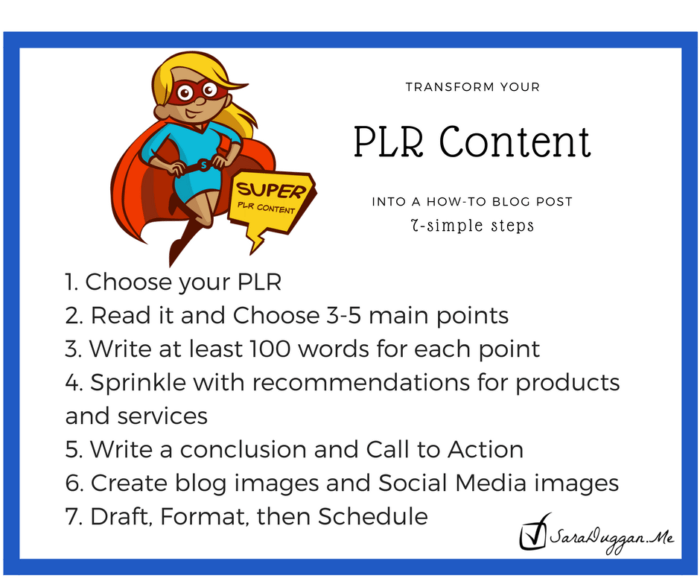
Step 7. Draft, Format, and then Schedule.
Your final step is to make it look pretty. You also want it to be easily read by your audience no matter what device they’re on.
As you can see, blogging isn’t too time-consuming when you use tools like PLR Content. The next time you’re crunched for new content, take this simple 7-step template and write your next How-To post. When you’re ready to hand this task over to someone else, I’m here. Learn more about my Done-for-You options.


Leave a Reply